Implementing Continuous Delivery
Chapter 8 explores the implementation of Continuous Integration (CI) and Continuous Delivery (CD) using GitHub Actions for the 'Quote of the Day' app. It covers automating the build, test, and deployment processes to ensure code correctness and seamless transition from development to production. The chapter emphasizes setting up GitHub Actions workflows, running automated tests with Cypress, packaging the app, and deploying it to GitHub Pages, thereby achieving a reliable and efficient development-to-deployment pipeline.
In this chapter, you will learn
By the end of the previous chapter, we had established many automated mechanisms in our local development to ensure code correctness. Moreover, because all these configurations are stored in our code repository, all team members have nearly identical settings, making our development and packaging process nearly perfect.
However, there's a subtle but significant problem. That is, can our locally running program still function properly in the production environment? A common issue we often encounter is that everything seems fine in our tests, manual checks also reveal no problem, yet issues emerge once the system is deployed.
This is due to potential discrepancies between our local configurations and those of the production or test environments, upon which our application depends. This leads to the "It works on my machine" problem.
To solve this issue, we need to introduce the practices of Continuous Integration and Continuous Delivery. The good news is that it's relatively easy to implement Continuous Integration and Continuous Delivery with our existing build scripts and GitHub Actions.
Continuous Integration
Continuous Integration (CI) is a development practice where developers frequently integrate their code into a main branch multiple times a day. Each integration is verified by an automated build (including compiling, deploying, and automated testing) to detect and fix integration errors as early as possible. This allows teams to discover problems quickly and encourages developers to make more frequent, smaller changes, reducing the time to find and fix problems.
- Agent: In a CI system, an Agent refers to the server executing the build tasks. It receives build tasks, runs build scripts, and then returns results. An Agent can be a physical machine, a virtual machine, or even a container.
- Task: A task is a series of specified operations that will be executed on a designated Agent. For instance, compiling code, running tests, packaging applications, etc.
- Build Script: A build script instructs the Agent how to perform the build task. Build scripts are typically maintained alongside the source code in a project.
- Working Principle: When developers push code to the version control system (e.g., Git), the CI service gets triggered and then runs the build task on the Agent. The Agent first fetches the latest code from the version control system and then executes the build script. This script usually includes steps like code compilation, test execution, and application packaging. If all steps are completed successfully, the build task succeeds. If any step fails, the build task fails.
The primary goal of continuous integration is to provide quick feedback. If the build fails, developers should be notified immediately so that they can fix the problem as soon as possible. Moreover, CI can provide a stable environment for running various tests to ensure code quality. To better implement continuous integration, teams need to follow some best practices, such as keeping builds fast, avoiding "broken builds," and frequently integrating code.
In this chapter, we will explore how to use Github Actions to implement Continuous Integration and eventually Continuous Delivery.
Introduction to Github Actions
GitHub Actions is an automation tool provided by GitHub, allowing you to write and execute CI/CD (Continuous Integration/Continuous Delivery) workflows directly within your GitHub repository. This means you can automate any aspect of your software development workflow, including building, testing, and deploying your application, and much more.
Each GitHub Action workflow consists of one or more jobs, and each job is made up of a series of steps. These steps could be executing commands, running scripts, or using actions shared by the GitHub community. The "Runner" here is the "Agent" in traditional CI servers, used for executing tasks.
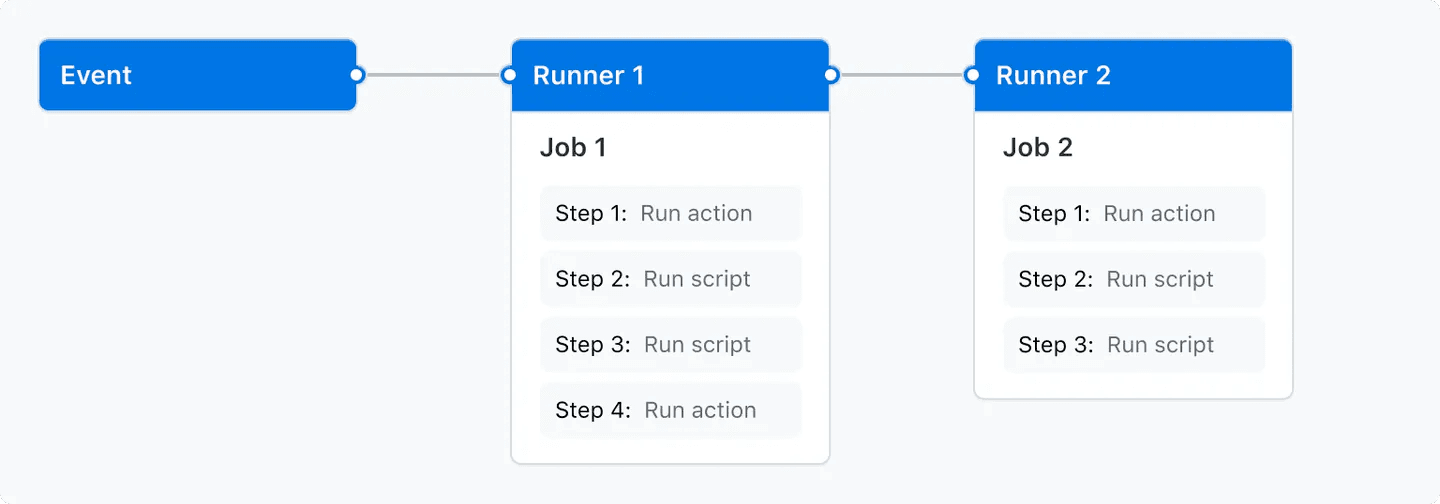
These workflows can be triggered by various GitHub events, such as push, pull request, or release. You can also schedule workflows to run at specific times or
intervals, like cron jobs.
Below is a simple example of a GitHub Actions workflow. It runs unit tests every time code is pushed to the main branch:
name: Run tests

on:
  push:
    branches:
      - master

jobs:
  test:
    runs-on: ubuntu-latest

    steps:
    - name: Check out repository
      uses: actions/checkout@v2

    - name: Set up Node.js
      uses: actions/setup-node@v1
      with:
        node-version: 14

    - name: Install dependencies
      run: npm ci

    - name: Run tests
      run: npm test
This configuration file outlines the job's workflow: first, check out your code on an Ubuntu virtual environment, then set up the Node.js environment, install dependencies, and finally, run the tests. Let's explain it line by line:
jobs:: This is where the workflow's jobs begin. At this level, you can define one or more jobs that run in parallel unless you explicitly specify their dependencies.test:: This is the name of the job, and you can choose any name. In this case, the job's goal is to run tests, so it's called "test".runs-on: ubuntu-latest: This tells GitHub Actions to run this job on the latest Ubuntu virtual environment.steps:: This is where you define the steps to be executed in the job.name: Check out repository: This is the name of the step. This step's purpose is to check out the repository's code.uses: actions/checkout@v2: This tells GitHub Actions to use the "actions/checkout@v2" action. This action checks out your code repository on the runner, allowing subsequent steps to access it.name: Set up Node.js: This step sets up the Node.js environment.uses: actions/setup-node@v1: This action sets up the Node.js environment.with:: This is used to pass parameters to the action.node-version: 14: This tells the setup-node action the version of Node.js we want to set up.name: Install dependencies: This step installs the project's dependencies.run: npm ci: This runs the "npm ci" command, which will install the project's dependencies accurately according to the package-lock.json file.name: Run tests: This step runs the tests.run: npm test: This runs the "npm test" command, which will execute the tests defined in the package.json file.
This approach of defining and running CI/CD workflows directly in the code repository makes it easier for development teams to track and manage the automation process and integrates it more closely with the code.
Creating a Workflow
Let's now start defining a Github Actions workflow in our project. First, create the directory .github/workflows needed for the workflow, and then create a build.yml file:
mkdir -p .github/workflows
touch .github/workflows/build.yml
In .github/workflows/build.yml, we first define a job named build, which contains four steps: checkout code, set up the Node.js environment, install dependencies, and run npm run build.
name: Build Quote Application

on:
  push:
    branches: [ "main" ]

jobs:
  test:
    name: Test
    runs-on: ubuntu-latest

    steps:
      - uses: actions/checkout@v3

      - name: Setup node
        uses: actions/setup-node@v3
        with:


          node-version: 18.14.2
          cache: npm

      - name: Install
        run: npm ci

      - name: Test
        run: npm run lint
We commit the entire .github directory and then push it to Github. This will trigger Github Actions to execute the workflow we defined.
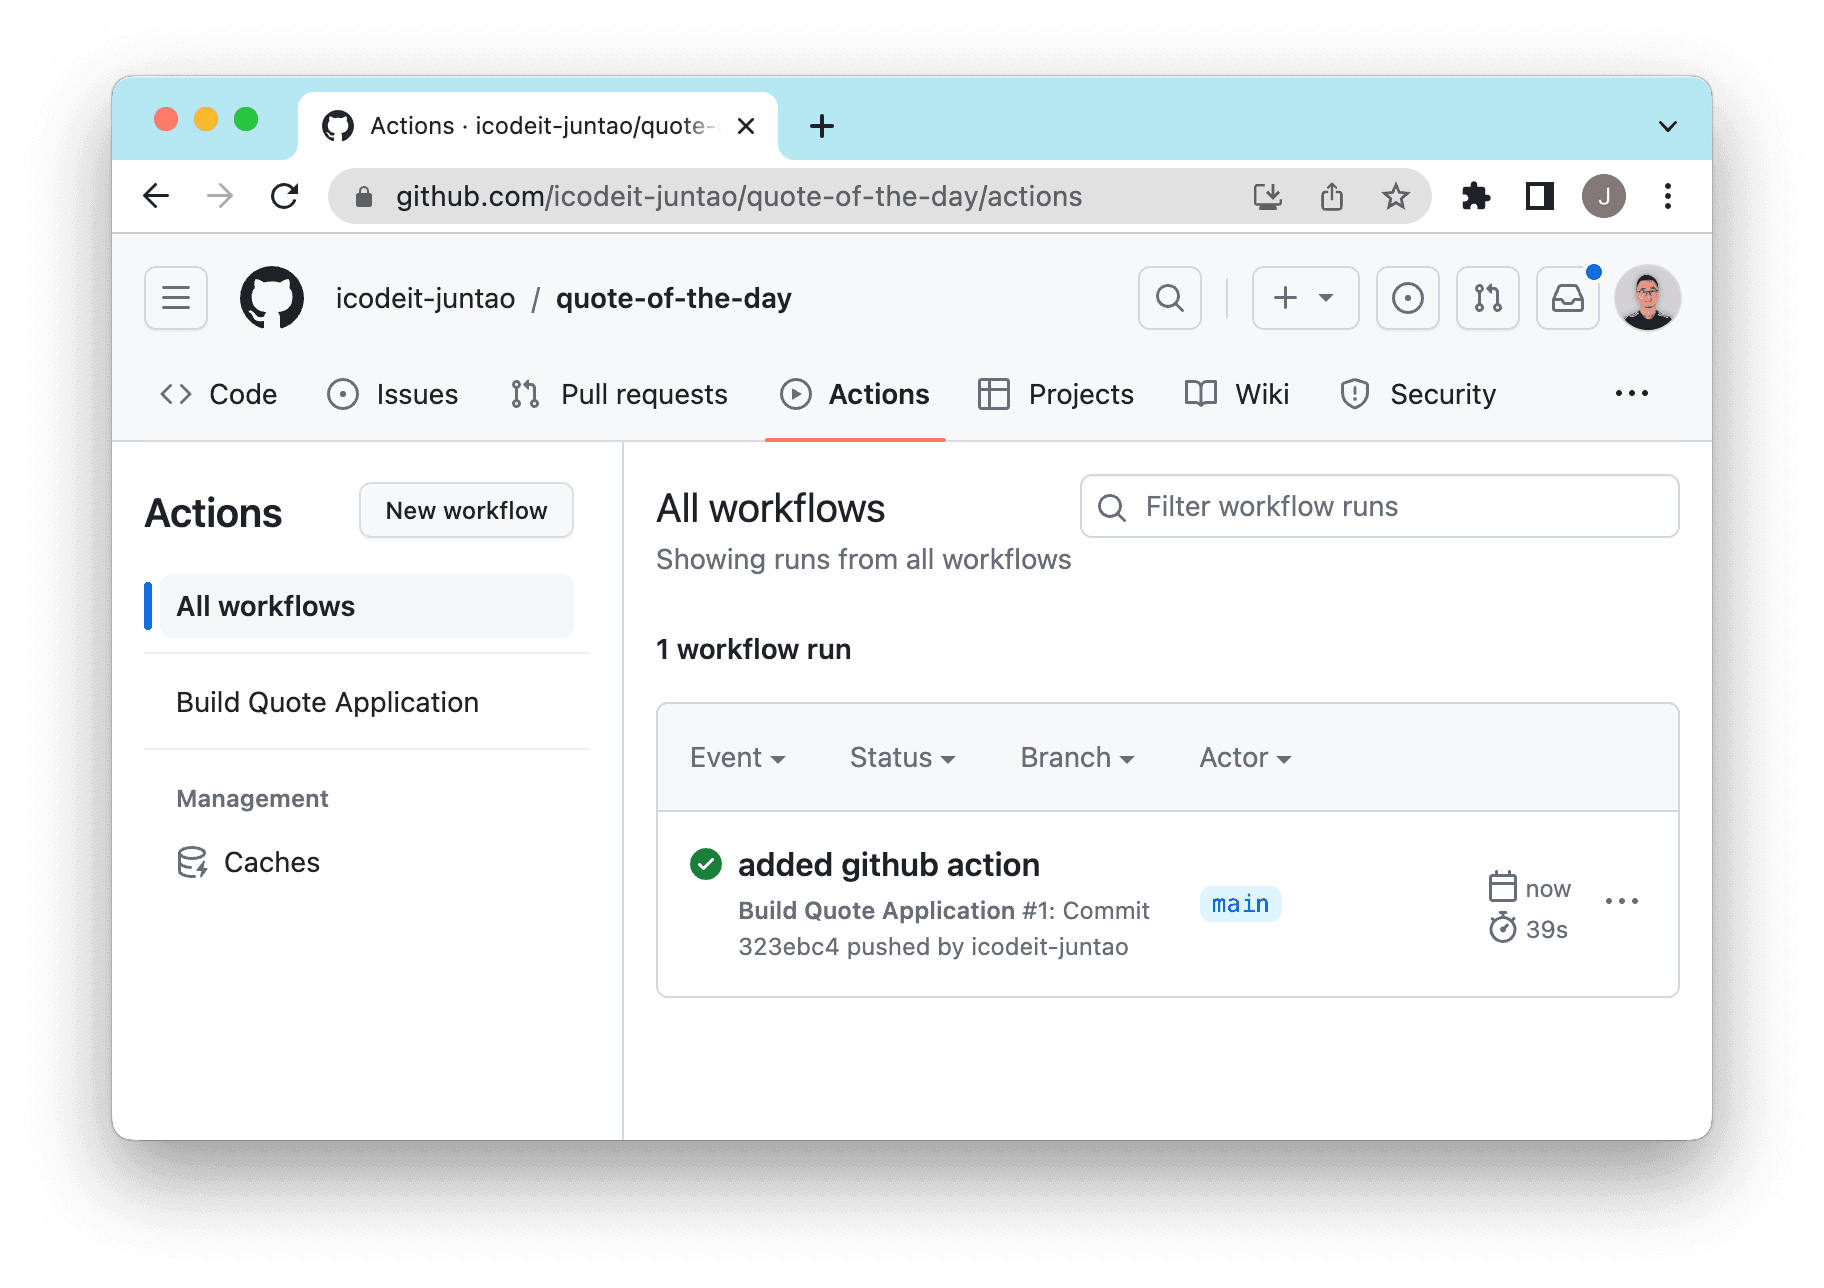
As can be seen, our workflow runs successfully. We can expand on this test, adding more steps. A common task is packaging, i.e., compressing the final build files into a package for deployment.
Packaging the Software
We can make some minor adjustments to the build.yml file to run npm run build after the tests are completed, which compiles the source code and generates a package.
name: Build Quote Application

on:
  push:
    branches: [ "main" ]

jobs:
  build:
    name: Build Frontend Package
    runs-on: ubuntu-latest

    steps:
      - uses: actions/checkout@v3

      - name: Setup node
        uses: actions/setup-node@v3
        with:
          node-version: 18.14.2
          cache: npm

      - name: Install
        run: npm ci

      - name: Test
        run: npm run lint

      - name: Build
        run: npm run build

      - name: Packaging
        uses: actions/upload-artifact@v3
        with:
          name: quote-of-the-day
          path: dist/
We have added build and packaging as new steps. These steps compile the application source code to the dist directory and then package and compress the result into quote-of-the-day using upload-artifact.
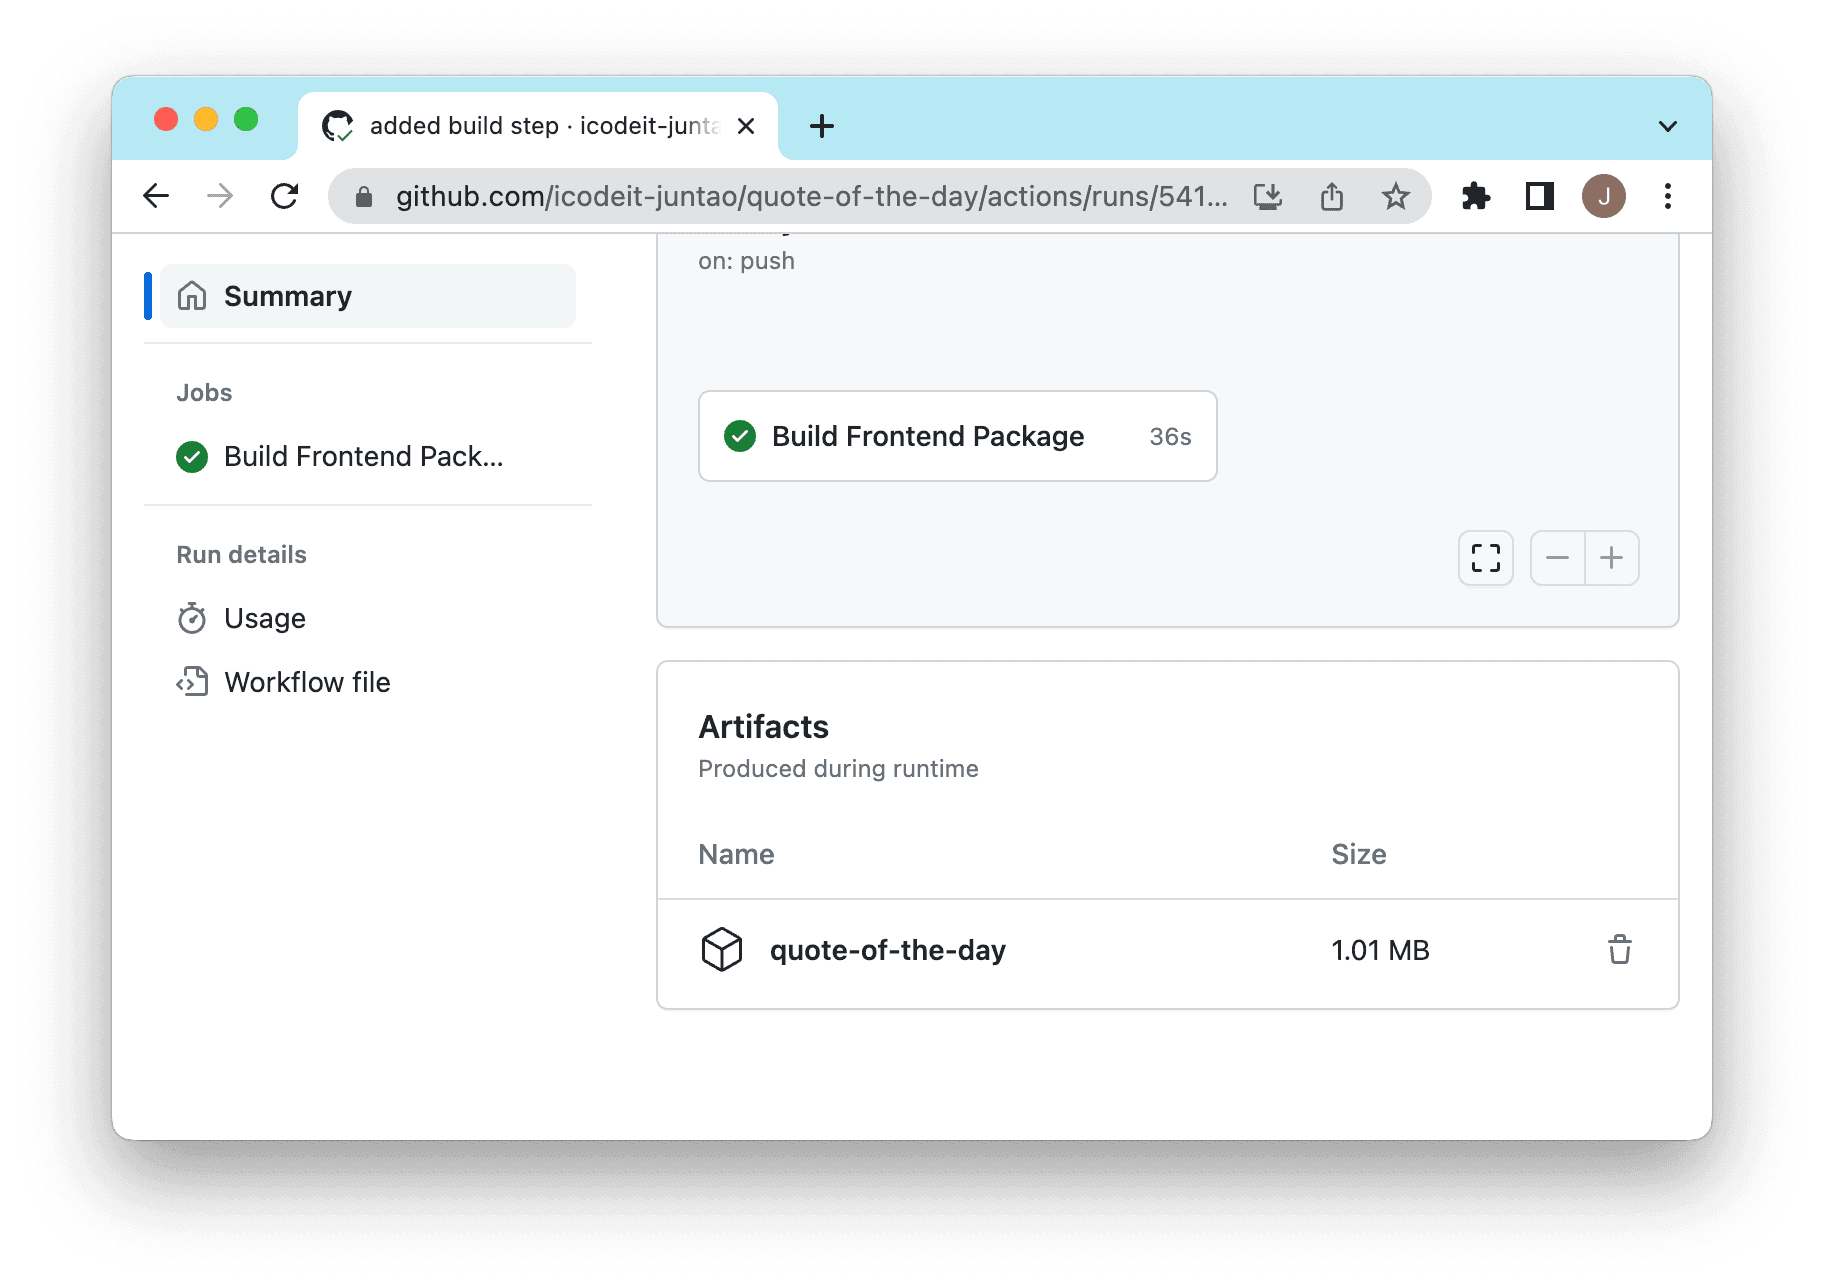
Great! Our software now doesn't depend on any developer's local environment. Developers can use Mac, Linux, or even Windows. As long as the environment used on the CI server (i.e., ubuntu-latest) is consistent with the production environment, the package is ready to go.
Performing Acceptance Testing
In addition, we want to execute automated acceptance tests in the CI environment. This allows us to immediately know and fix if any functionality is broken. These tasks need to be executed after the packaging is complete. If the static checks fail, or the compilation fails, we don't need to perform acceptance tests. That is, the step of running acceptance tests depends on the static checks and compilation process.
Running acceptance tests is generally complex. We need to start the http-server at the right time, run the tests, and then shut down the http-server after the tests are finished. However, cypress provides packaged Github Actions that we can simply call.
We need to add a new job in the build.yml file:
cypress:
    needs: build
    runs-on: ubuntu-latest
    steps:
      - name: Checkout
        uses: actions/checkout@v3

      - name: Cypress run
        uses: cypress-io/github-action@v5
        with:
          build: npm run build
          start: npm start
          command: npm run e2e
We defined a new GitHub Actions job named cypress, which is responsible for running end-to-end tests during the continuous integration process. Some points to note here:
needs: build: This indicates that this job depends on another job named "build". The "cypress" job will start running only after the "build" job has been successfully completed.uses: cypress-io/github-action@v5: This uses the official Cypress GitHub action. This action sets up and runs Cypress tests.build: npm run build: Before running the tests, this parameter tells the Cypress action to execute the "npm run build" command to build the project.start: npm start: This parameter tells the Cypress action to start the application before running the tests, which is accomplished by executing the "npm start" command.command: npm run e2e: This parameter defines the actual command to be run, i.e., "npm run e2e", which starts Cypress and runs the tests defined in
Creating a Software Package
We can make some simple modifications to our build.yml so that after the tests have been completed, npm run build is executed to compile the source code and create a package.
name: Build Quote Application

on:
  push:
    branches: [ "main" ]

jobs:
  build:
    name: Build Frontend Package
    runs-on: ubuntu-latest

    steps:
      - uses: actions/checkout@v3

      - name: Setup node
        uses: actions/setup-node@v3
        with:
          node-version: 18.14.2
          cache: npm

      - name: Install
        run: npm ci

      - name: Test
        run: npm run lint

      - name: Build
        run: npm run build

      - name: Packaging
        uses: actions/upload-artifact@v3
        with:
          name: quote-of-the-day
          path: dist/
We have added two new steps, build and packaging, where the application's source code is first compiled into the dist directory. Afterward, the upload-artifact is used to package and compress the results into quote-of-the-day.
Great! With this, our software no longer depends on any developer's local environment. It doesn't matter whether a developer uses Mac, Linux, or Windows. As long as the environment used on the CI server (in this case, ubuntu-latest) is consistent with the production environment, the package is ready to go.
Performing Acceptance Testing
In addition to this, we want to run automated acceptance tests in the CI environment. This way, we can know and fix any broken functionality as soon as possible. These tasks need to be performed after the packaging is done. If static checks fail, or if the compilation fails, there's no need to perform acceptance tests. In other words, the step to run acceptance tests depends on the static check and compilation process.
Normally, running acceptance tests is a complex process: we need to start the http-server at the right time, run the tests, and then shut down the http-server after the tests have ended. However, cypress provides pre-packaged Github Actions that we can call directly.
We need to add a new task to build.yml:
cypress:
    needs: build
    runs-on: ubuntu-latest
    steps:
      - name: Checkout
        uses: actions/checkout@v3

      - name: Cypress run
        uses: cypress-io/github-action@v5
        with:
          build: npm run build
          start: npm start
          command: npm run e2e
Here we have defined a new GitHub Actions task named cypress, which is responsible for running end-to-end tests during the continuous integration process. There are several points to note:
needs: build: This indicates that the job depends on another job named "build". The "cypress" job will only start running after the "build" job has been successfully completed.uses: cypress-io/github-action@v5: This uses the official GitHub action provided by Cypress. This action sets up and runs Cypress tests.build: npm run build: This parameter tells the Cypress action to execute the "npm run build" command to build the project before running the tests.start: npm start: This parameter instructs the Cypress action to start the application before running the tests, which is done by executing the "npm start" command.command: npm run e2e: This parameter instructs the Cypress action to run the actual end to end test command.
Excellent! With the support of these automated build scripts and workflows, each push will trigger this workflow, in which static checks and automated tests will be executed. This ensures that each code modification can generate a deployable release-ready software.
It is the time to take a quiz
Can we take this a step further? If all tests pass each time, and the acceptance test also passes, we can deploy the application to the production environment. This way, our new features can be used by real users!
Continuous Delivery
Continuous Delivery (CD) is a strategy in software development that emphasizes every change being frequently, reliably, and readily deployable to a production environment whenever necessary. In CD, the software is deployable throughout its life cycle. Developers continually submit code changes to the version control system and verify these changes through automated build and test processes. These changes are then deployed for more in-depth testing in a production-like environment. If everything goes well, these changes can be deployed to the production environment. In this way, CD keeps the software in a constantly releasable state.
Benefits of Continuous Delivery:
- Reduces Risk: CD ensures that changes made in each deployment are small, reducing the chances of issues arising, making it easier to troubleshoot and fix problems.
- Improves Quality: With automated testing and deployment, CD helps to reduce human errors, improving software quality.
- Faster Time-to-Market: CD allows you to release new features and improvements more quickly and frequently, thereby meeting user needs faster and improving user satisfaction.
With Github Actions, we can easily achieve continuous delivery. Be it a frontend or backend application, we can easily deploy a release-ready software to the appropriate environment using the packaged actions provided by Github Actions and other third-party platforms.
Since our application is a pure frontend program, it does not need to deploy its own backend service, so we can deploy it to Github Pages. GitHub Pages is a static website hosting service provided by GitHub. It can directly get HTML, CSS, and JavaScript files from repositories on GitHub, and then generate a website that is publicly accessible. This allows users to easily establish and maintain personal websites, project websites, or even documentation libraries.
We hope to complete a release after the acceptance tests pass. We need to define a new deploy task as follows:
deploy:
    name: Deploy Application
    runs-on: ubuntu-latest
    needs: cypress

    environment:
      name: github-pages
      url: ${{ steps.deployment.outputs.page_url }}

    steps:
      - name: Deploy to GitHub Pages
        id: deployment
        uses: actions/deploy-pages@v2
This configuration defines a workflow task named "deploy", the purpose of which is to deploy the application. It needs to run in the "ubuntu-latest" environment and depends on the previously defined "cypress" task. If the "cypress" task is successfully completed, the "deploy" task will start running.
The environment field defines the environment name and URL in which the task runs. Here the environment is named "github-pages", and the URL is determined by the output parameter "page_url" of the deployment step.
In the steps section, a step named "Deploy to GitHub Pages" is defined, using the "actions/deploy-pages@v2" Github Action. This action deploys your application to GitHub Pages.
id: deployment gives this step a unique ID. Subsequent steps or tasks can get the output content of this step through this ID. For example, ${{ steps.deployment.outputs.page_url }} here gets the "page_url" output of this step.
Also, in the build step, besides using actions/upload-artifact@v3, we need to use a special
action to package for Github Pages:
- name: Upload pages artifact
  uses: actions/upload-pages-artifact@v1
  with:
    name: github-pages
    path: dist/
Note that here you need to define the final filename as github-pages, so that Github Pages can correctly recognize it. If you commit and push the code at this point, you will see an error on the Github's Actions tab:
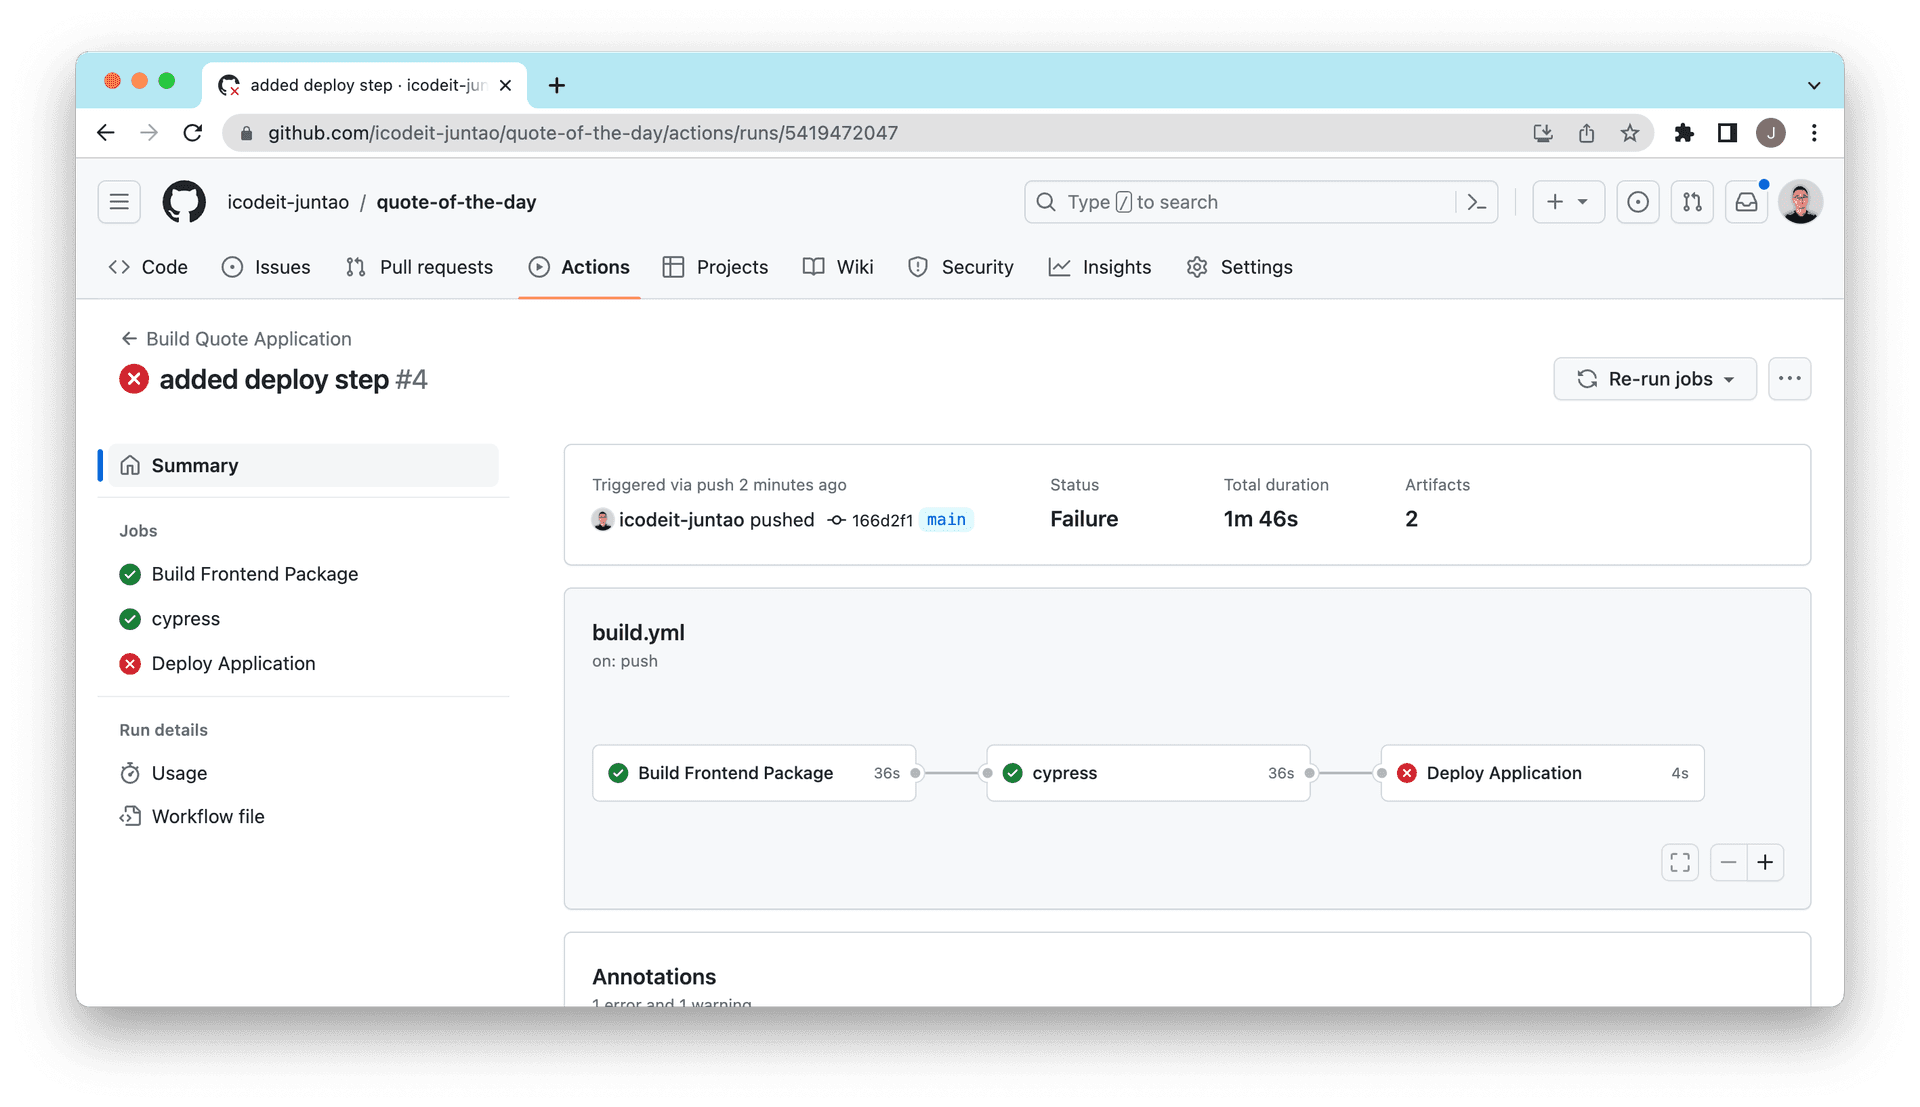
Checking the log, we can see that Github has not enabled the "Deploy with Actions" feature by default, so we need to enable this feature in the project settings.
Error: Error: Failed to create deployment (status: 404) with build version 1da0b6ac55db2504119ce931701b4b667bd34efe.
Ensure GitHub Pages has been enabled: https://github.com/icodeit-juntao/quote-of-the-day/settings/pages
So we need to enable the beta option for Github Actions:

Besides, as the deployment needs to modify our code repository, we need to specify write permissions for build.yml.
permissions:
  contents: read
  pages: write
  id-token: write
With this, our application can finally be deployed successfully. Notice the dependencies here. The deployment task depends on the acceptance testing, which depends on the build. In this way, if our tests are thorough enough, the application deployed to the production environment is guaranteed to work.
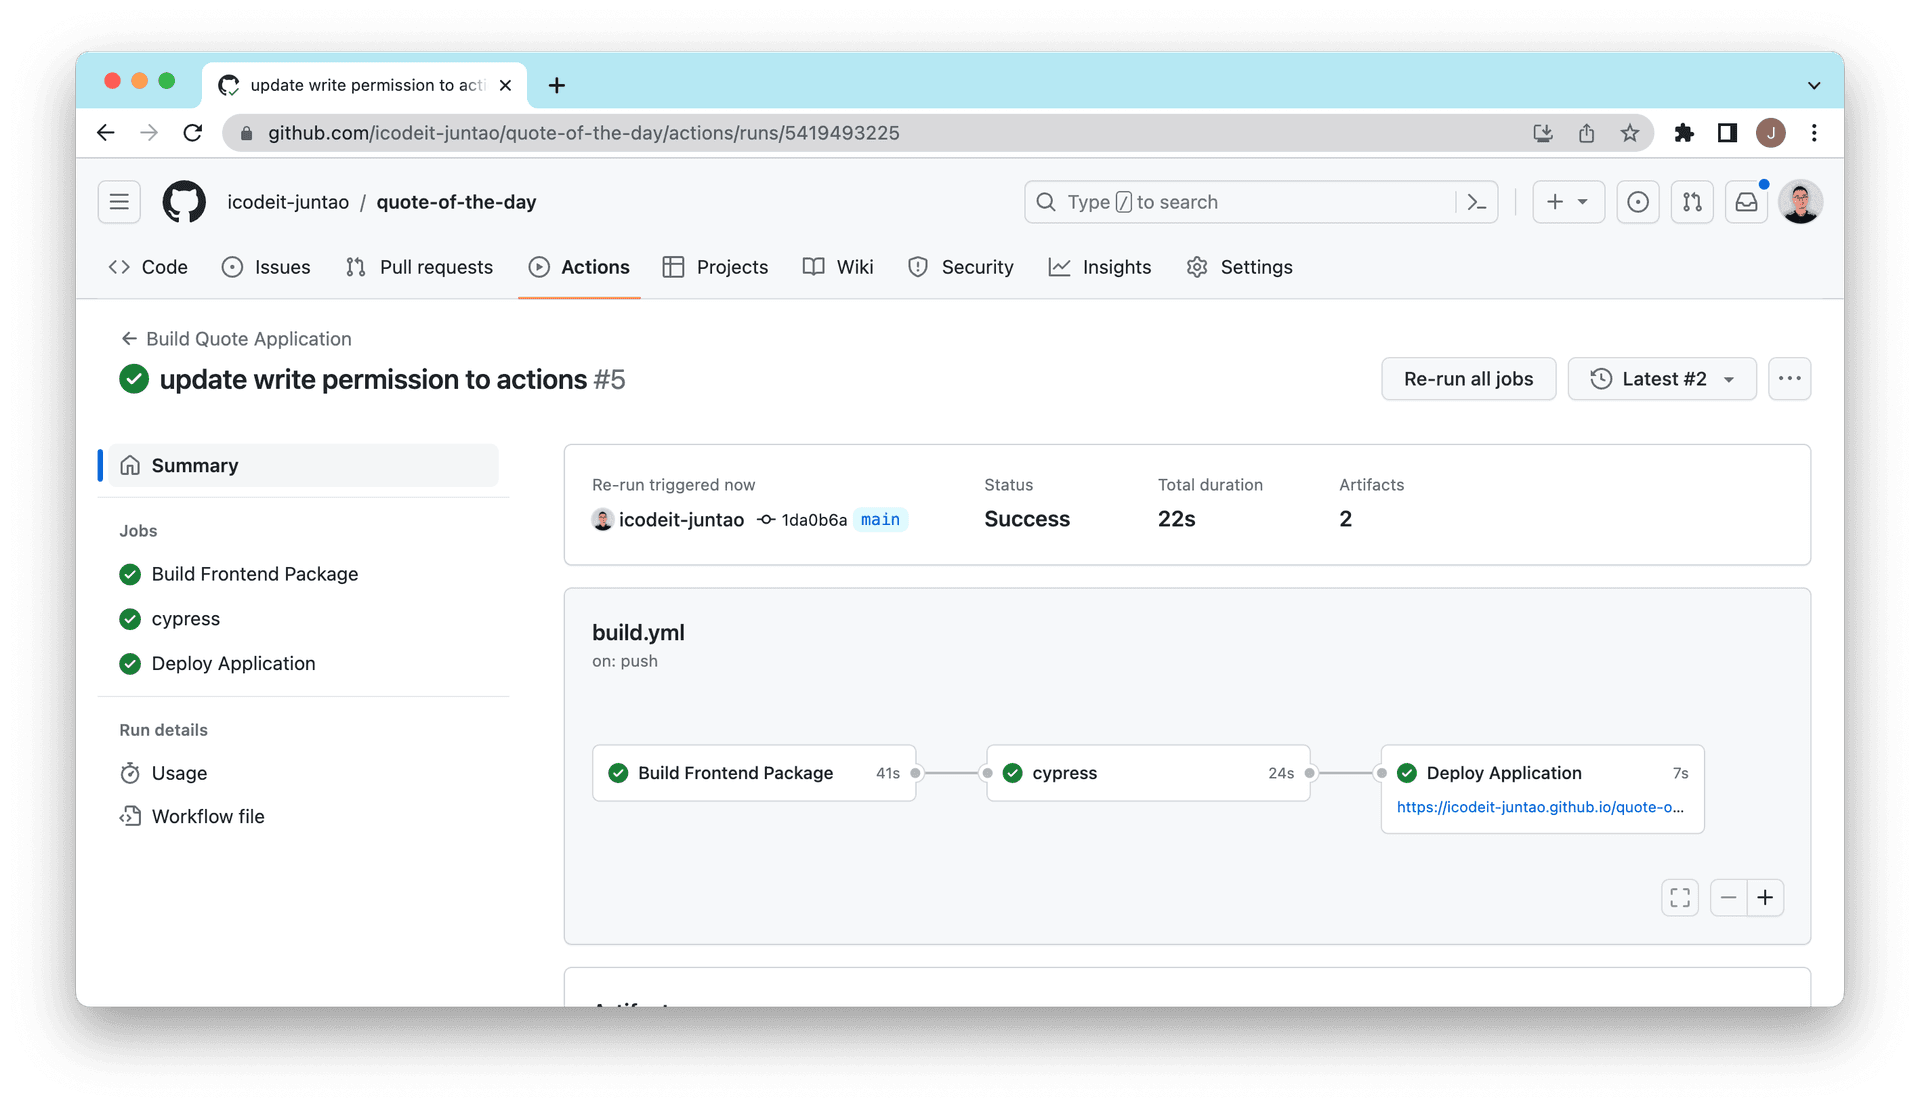
And the final build.yml config is:
name: Build Quote Application

on:
  push:
    branches: [ "main" ]

permissions:
  contents: read
  pages: write
  id-token: write

jobs:
  build:
    name: Build Frontend Package
    runs-on: ubuntu-latest

    steps:
      - uses: actions/checkout@v3

      - name: Setup node
        uses: actions/setup-node@v3
        with:
          node-version: 18.14.2
          cache: npm

      - name: Install
        run: npm ci

      - name: Test
        run: npm run lint

      - name: Build
        run: npm run build

      - name: Upload pages artifact
        uses: actions/upload-pages-artifact@v1
        with:
          name: github-pages
          path: dist/

      - name: Packaging
        uses: actions/upload-artifact@v3
        with:
          name: quote-of-the-day
          path: dist/

  cypress:
    needs: build
    runs-on: ubuntu-latest
    steps:
      - name: Checkout
        uses: actions/checkout@v3

      - name: Cypress run
        uses: cypress-io/github-action@v5
        with:
          build: npm run build
          start: npm start
          command: npm run e2e

  deploy:
    name: Deploy Application
    runs-on: ubuntu-latest
    needs: cypress

    environment:
      name: github-pages
      url: ${{ steps.deployment.outputs.page_url }}

    steps:
      - name: Deploy to GitHub Pages
        id: deployment
        uses: actions/deploy-pages@v2
In our workflow for continuous deployment, we defined the automation of our project's build, test, and deployment process. It is triggered whenever there is a new commit in the main branch, executing the three tasks defined below:
- Build Task: This task executes in the latest version of Ubuntu. It accomplishes code checkout, sets up the Node environment, installs dependencies, performs testing (linting), and builds the application. Once the build is completed, the build product (the
distfolder) is uploaded as an artifact. - Cypress Task: This task depends on the successful completion of the build task, which means the Cypress task only executes once the build task has been successfully completed. It also operates in the latest version of Ubuntu, checking out the code and then running Cypress to carry out end-to-end tests.
- Deploy Task: This task is dependent on the Cypress task, meaning the deploy task will only execute once the Cypress task has successfully completed. This task is responsible for deploying the built product to GitHub Pages. Upon task success, the URL of the deployed page will be output.
Summary
In this chapter, we discussed how to automate our development process using GitHub Actions, achieving continuous integration and continuous delivery (CI/CD). We first introduced GitHub Actions, a tool that enables the execution of software workflows directly within GitHub repositories.
We set up three main tasks in our workflow: building the frontend package, running end-to-end tests, and deploying the application to GitHub Pages. In the build task, we used GitHub Actions to carry out operations such as installing dependencies, running lint checks, and compiling the application. Following this, we established an end-to-end test task dependent on the build task to automatically run Cypress tests post-build.
Finally, we configured a deployment task, which depends on the Cypress testing task and only executes when all tests pass. Within the deployment task, we utilized GitHub Actions' deployment page feature, deploying the compiled application to GitHub Pages.
Through this method, we achieved full automation from code submission to application deployment. This not only enhanced development efficiency but also ensured code quality and application stability.
You have Completed Chapter 8
With CI/CD practices in place, your development process is now more streamlined and reliable, ensuring the 'Quote of the Day' app performs optimally in production.
Moving forward, the tutorial will delve into more advanced development techniques, enhancing the application's functionality and user experience.